

Formal to Functional: Living Room to Home Office Remodel
What looked like a straightforward door installation turned into a full framing rebuild — and a hunt through Seattle's oldest millwork yards to find trim that hadn't been produced in years. Here's what we found inside the walls.
What started as an “easy” door-hanging job turned into a trip through Seattle's oldest millwork yards, creating custom-milled trim, and eventually ended with a husband’s work (finally) off the kitchen counter.
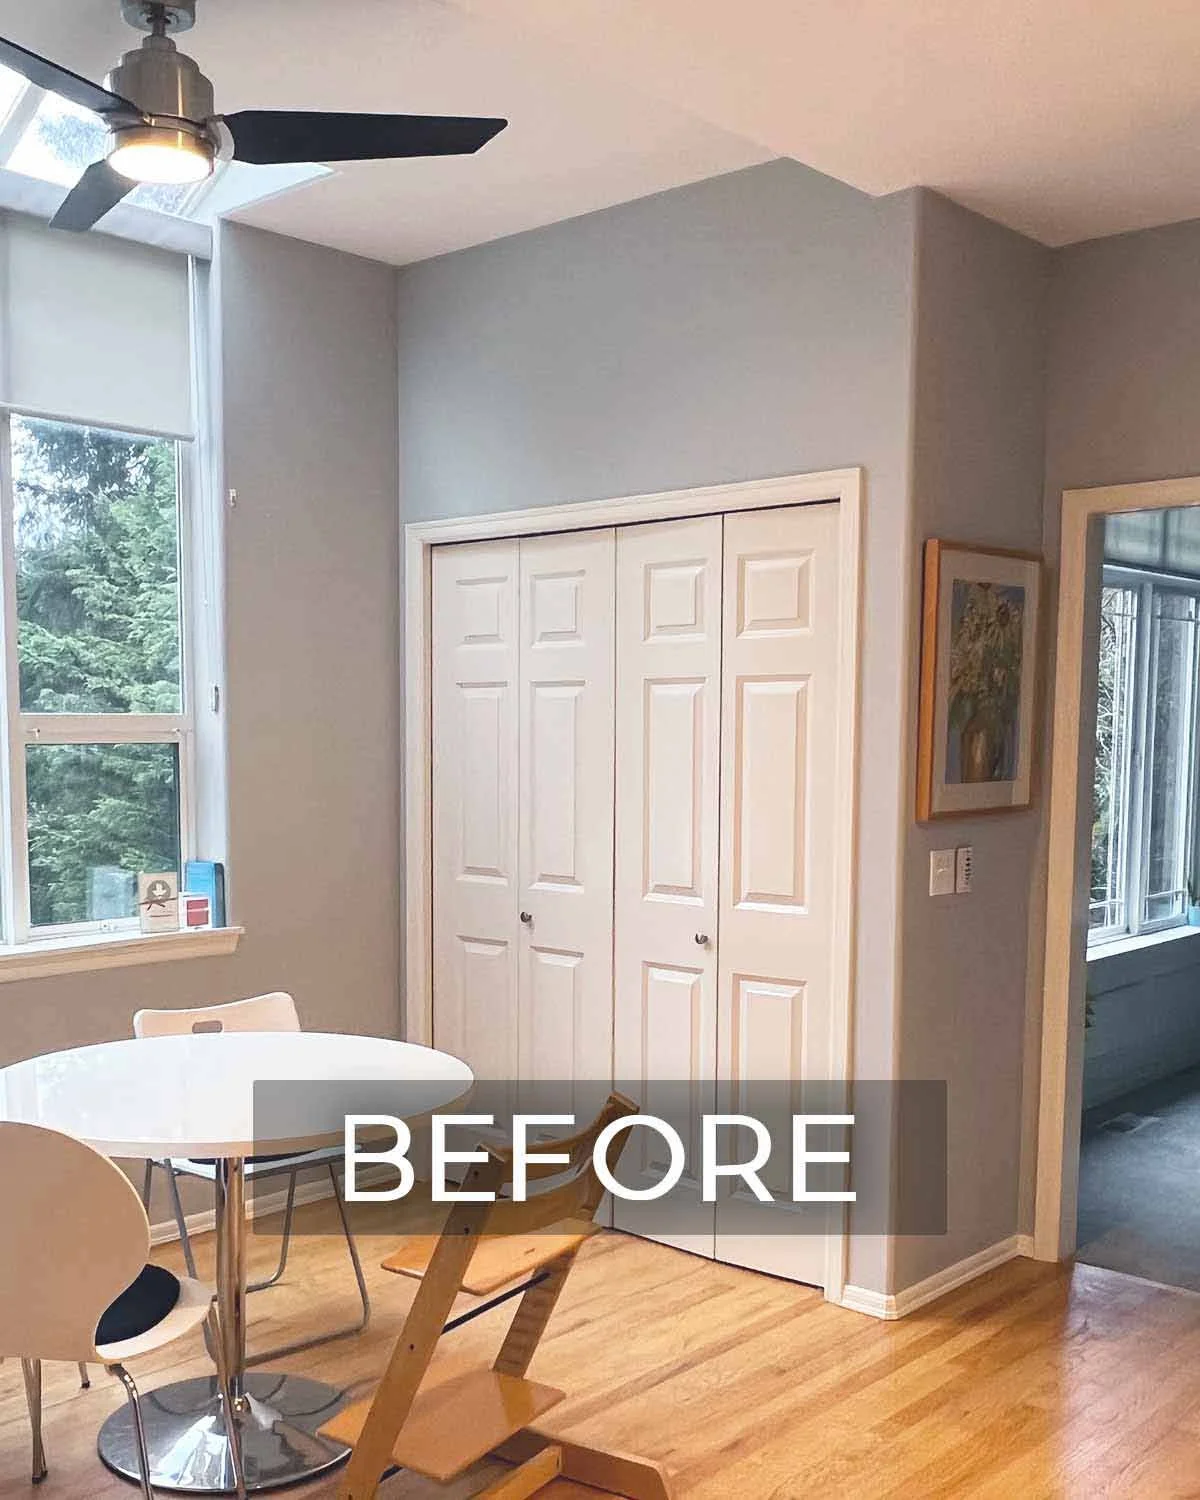
A homeowner wanted to convert her formal living room into an office for her husband, who recently started working from home and had his computer and paperwork taking over the kitchen. She simply needed a closed off space for him by adding double doors onto a wide cased opening that led into the old living room, which seemed straightforward enough.
The problems behind the doors
First, the doors were ordered, but took weeks longer than expected due to weather and shipping issues. Once they arrived, the custom factory staining (to match the rest of the doors in the house) took additional time. Next, when our finish carpenter pulled back the casing to prep for the door installation, he found something that stopped the job cold. The cased opening had a 4 to 6 inch gap between the framing and the casing, and the trim was literally hanging on drywall with no structural support behind it.
The heavy weight of wood and glass double doors cannot hang on extended drywall alone. The casing had to come out completely, the walls were reframed correctly with proper two-by-fours, plus a new header was added, and the walls were drywalled, textured and painted before we could even think about installing the doors.
The millwork hunt
Rebuilding the framing was an unexpected structural challenge, but easy enough to fix. The bigger adventure turned out to be matching and replacing the trim. What seemed like a quick and easy $3,000 job was becoming closer to a $10,000 job.
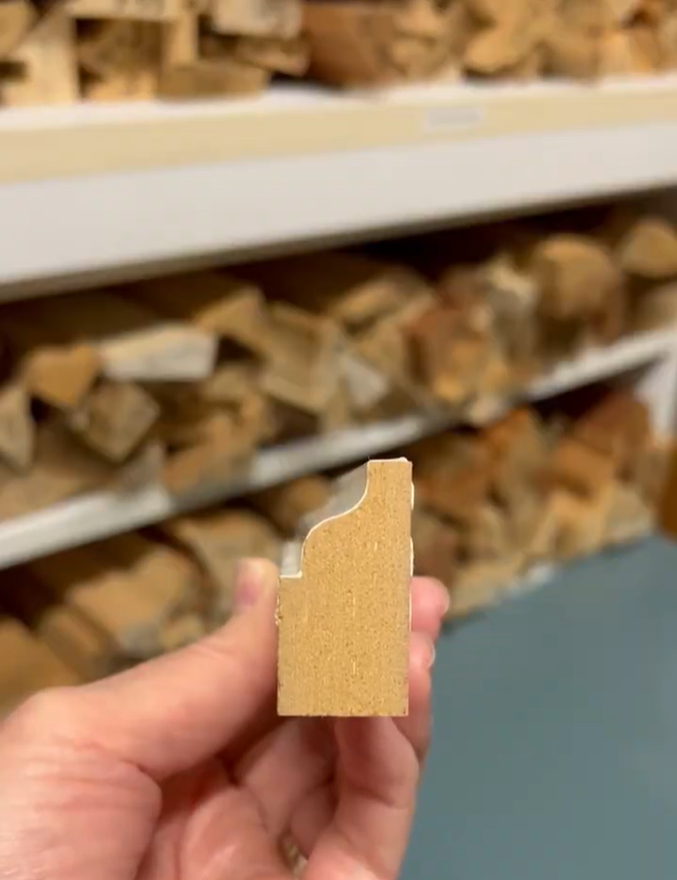
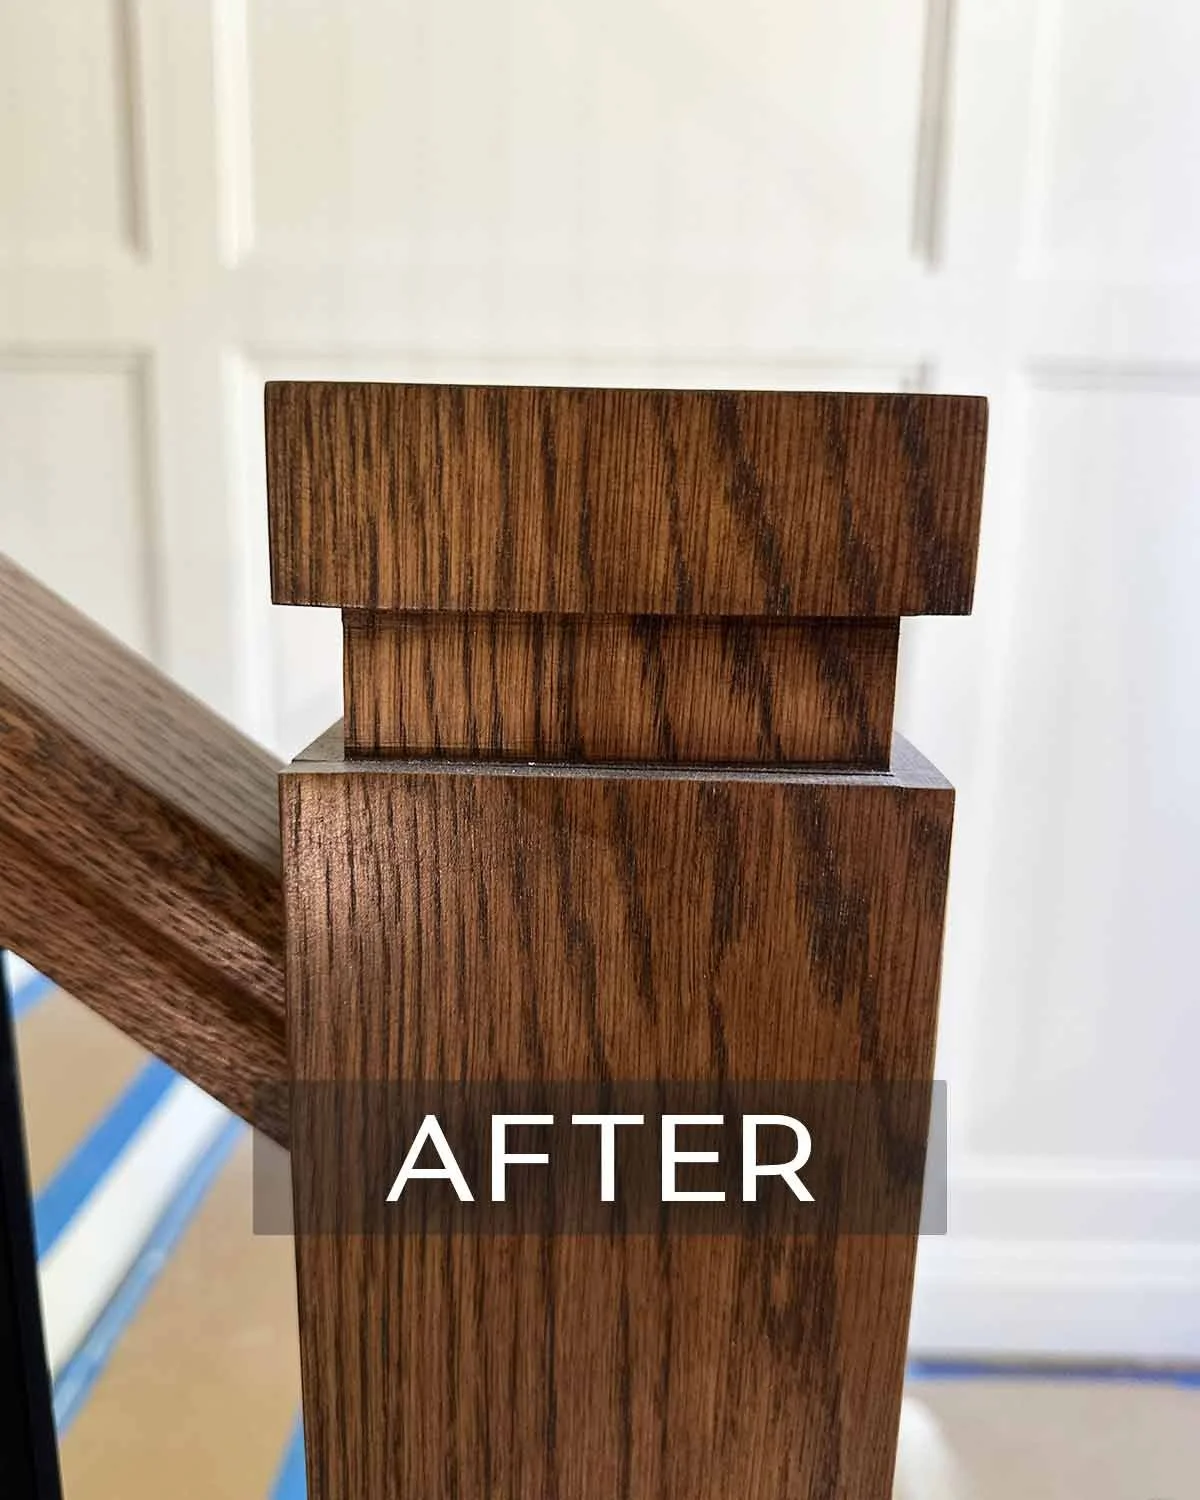
Built in the 1990s, the home had beautiful existing millwork throughout. Most of that was stained, but in the formal living room (now office), the custom millwork included very detailed casings, headers and an intricate chair rail, all painted white. Since we had to reframe the size of the door opening, there was a 3” gap on each side that needed to be filled in with millwork. Any new trim - casing, headers and chair rail details had to match to the existing 1990s millwork.
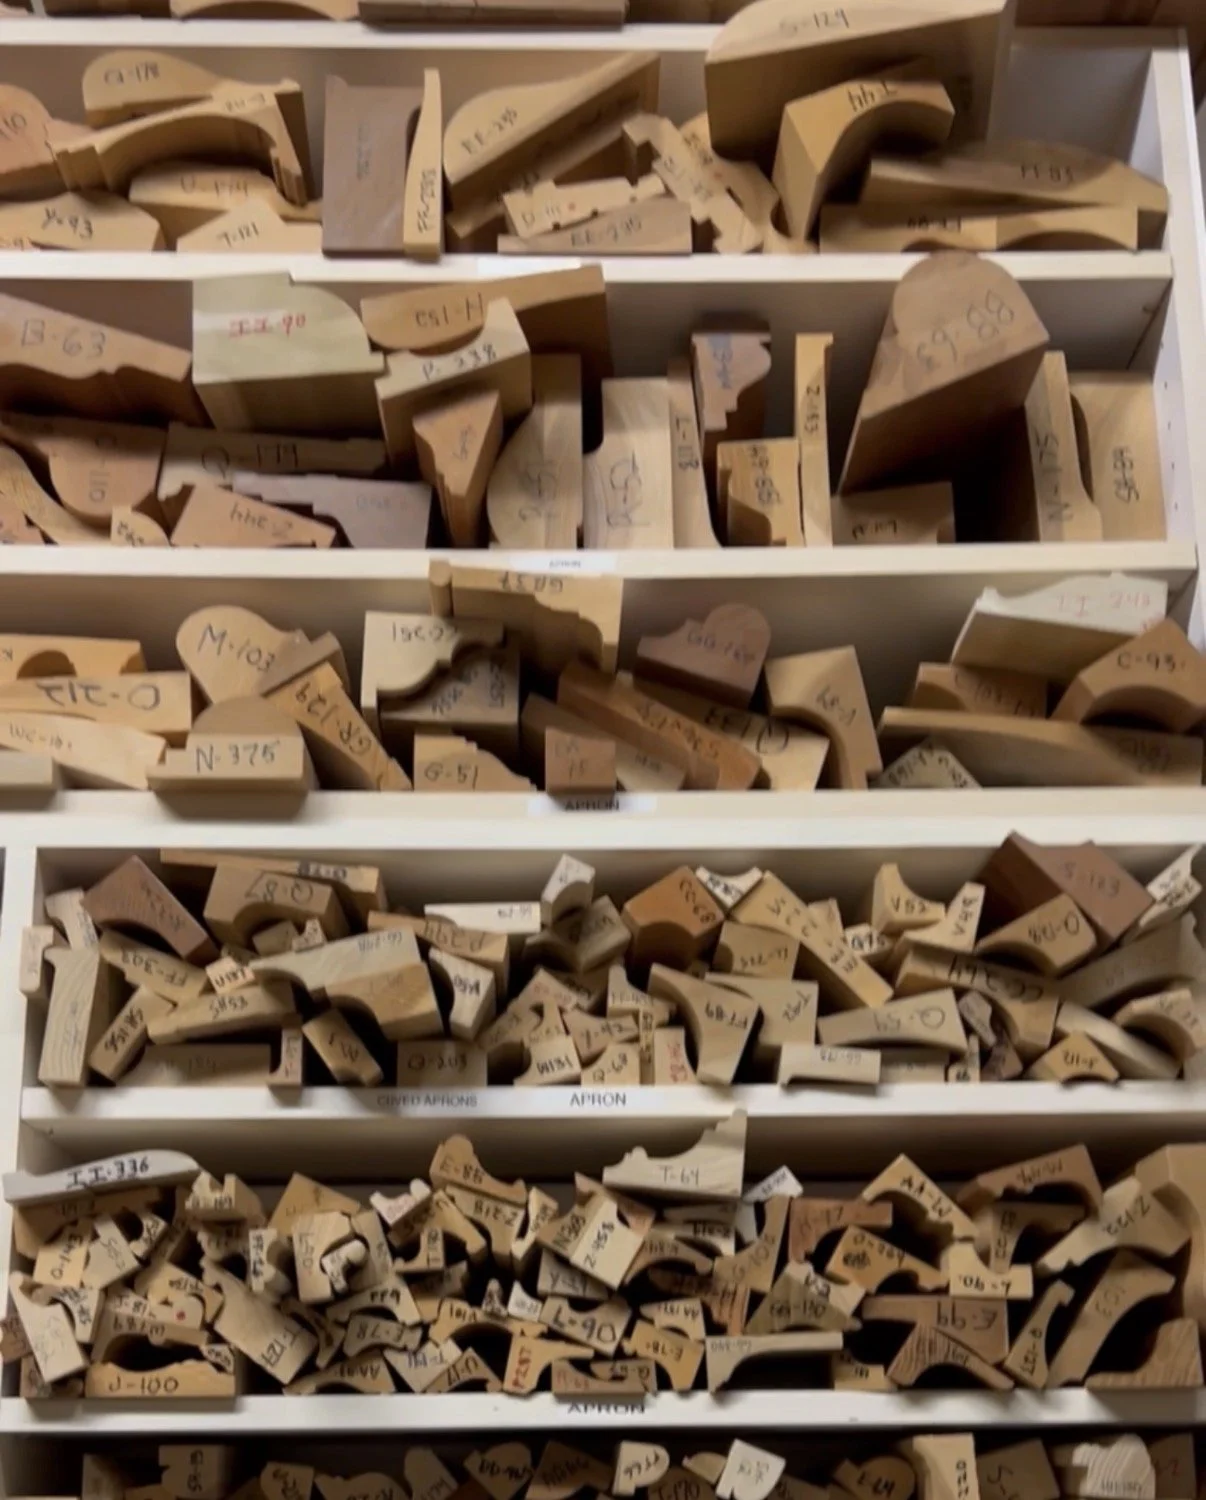
Custom millwork profiles aren't something you find at just any hardware store, and this particular profile hadn't been produced in years. So Kelly visited Seattle's older millwork yards — O.B. Williams (since 1889) and Limback Lumber (since early 1900s)— with a sample piece in hand, looking for a perfect match.
Kelly spent hours going through thousands of stacked profile samples, each one representing a different era and style. The profile in question was from the early 1990s, not particularly rare in terms of age but obscure enough that locating it required working through what felt like a catalog of nearly every trim piece ever produced in the Pacific Northwest. The first supplier didn't have the profile, but at the second shop, she handed over the sample piece and they recognized it immediately. They had the tooling to custom-mill the pieces she needed, and they cut them to spec.
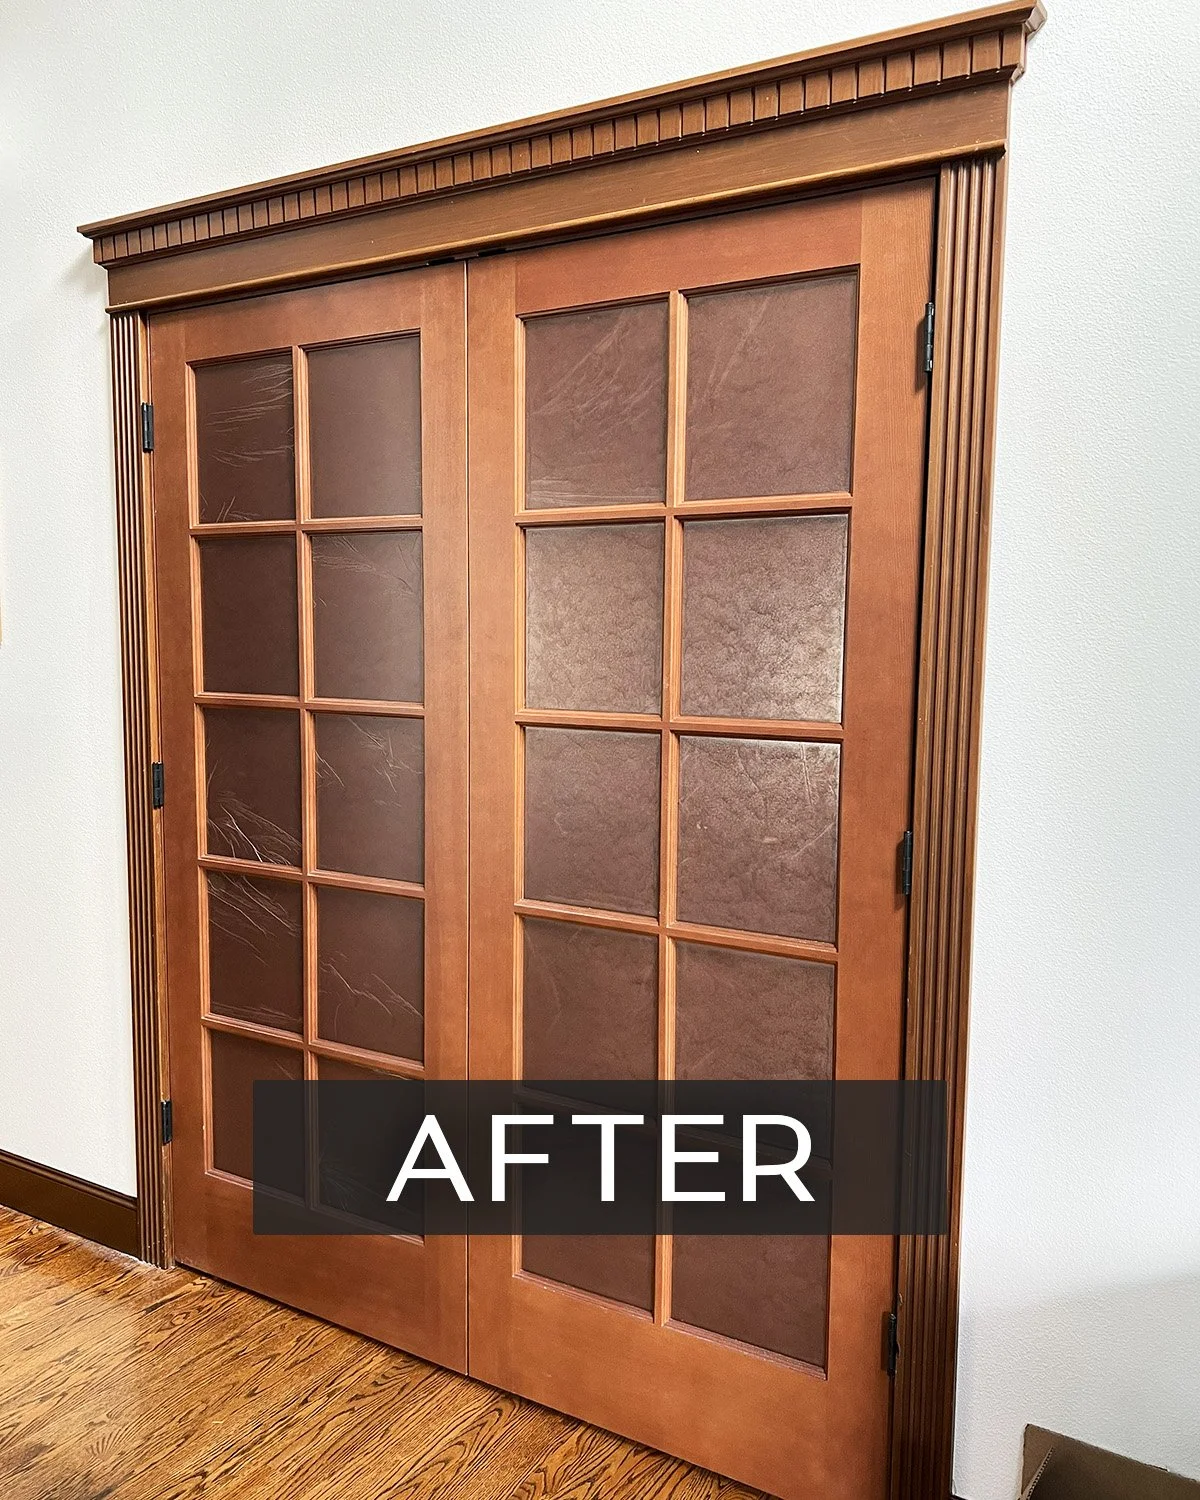
The result matched the rest of the house seamlessly.
What the finished space looks like
The old formal living room, once dark, heavy, and hardly used, now looks completely different, but still flows perfectly with the design of the entire house. This functioning home office is bright and beautiful with proper lighting and fresh White Dove paint throughout. The double glass doors are stained to match, and the hardware matches the existing doors. The client furnished the space with new Pottery Barn home office furniture, which provides drawers and cabinets to contain clutter, and best of all, to get her husband’s work off the kitchen counter!
What this project illustrates about remodeling
This project was a perfect example of what we explain to every client before we start: almost every remodel reveals something...the biggest questions are, what is the damage, and how much will this cost? The moment you open a wall or remove millwork, a cabinet, tile or anything from an older home, you often unveil unexpected (and expensive) surprises like structural issues, water damage, failed electrical or old plumbing. For this reason, we are reluctant to give firm estimates before we open walls. It's not evasiveness, we promise – it's just honesty, and it's the only fair way to set expectations.
If you're thinking about starting a remodel and want to understand more about how the estimating process works,our remodel guide covers what to expect before you commit to a project.
Construction surprises are the rule, not the exception
Older homes, even those built as recently as the 1990s and early 2000s, may have issues that don't surface until walls are open. Clients who understand this going in have a much better all-around experience with their contractor, who is ultimately there to fix the discovered issues!
Scope often grows once work begins, and that's okay
When surprise issues are discovered, the scope of work grows, the timeline extends and the budget expands. In the case of this home office, the structural correction was necessary to make sure the doors are solid, hung properly and will last for the life of the house.
Details (like millwork) matter more than people expect
Sierra Homes is very detail oriented. We make sure everything is done properly and no detail is missed. If the trim detail is not matching or even slightly off, we will notice that and fix it. Getting it right on this project required extra time and cost, and it was worth every bit of it in the end!
Frequently asked questions
Why can't contractors give exact remodel estimates upfront?
Until walls are opened, it's genuinely impossible to know what's behind them. Structural or framing issues, water damage, wood rot, electrical or plumbing problems, and code corrections are all common finds that may change the scope of a job. An experienced contractor can give a range and an honest set of conditions, but a firm fixed price before demo work is typically a sign that someone isn't being straight with you.
Can a formal living room be converted into a home office?
Yes, and it's a conversion that can make a real difference in how a home functions. Adding doors to an existing cased opening, updating lighting, and refreshing paint are all relatively contained changes that can transform an underused formal space into a room you actually want to work in.
How do you match existing millwork in an older home?
It requires locating the original profile, which may mean visiting specialty millwork yards or salvage suppliers with a sample piece in hand. Once the profile is identified, pieces can typically be custom-milled to match. It adds cost and lead time to a project, but a mismatched door casing will be noticeable for as long as you own the house, so it's usually the right call.
Is a living room-to-office conversion a good investment?
For homeowners who truly need dedicated workspace, this smart investment adds function to square footage that may otherwise go unused. Plus, a properly executed home office remodel, even with double doors added, can easily be converted back to a formal area for resale purposes. Glass doors in particular tend to read well to buyers because they allow light to move through the house rather than closing off a space completely.


Ready to rethink a space in your home?
Whether you have a room that isn't working for how you live now, or a design challenge that needs a fresh set of eyes, we'd love to talk through the possibilities.
How to Design a Kids' Bathroom That Ages Well
The tile, countertop, and cabinet choices you make in a kids' bathroom today will determine whether you're remodeling it again in ten years. Here's what we recommend for a space that holds up — and still has room for a little personality.
When families are building or remodeling a home, it is common to design the kids’ bathroom around the age of the children at the time of the build. Short cabinets, sparkly countertops, tiny fixtures scaled to small children, and trendy tile that looks charming at seven years old and dated by seventeen.
We know this firsthand. We made this mistake when we first built our own home fourteen years ago. The girls have grown up, the sparkly countertops have not; and now we are paying the price of a full bathroom remodel to bring the space up to date, and up to height!
We've worked on enough remodels to know this story is not unique to us. Parents invest real money into a kids' bathroom, and a decade later, they're tearing it out entirely because nothing held up—not the materials, not the design, and not the style. A little more thought at the outset can save a significant amount of money and disruption later.
Here's what we recommend when designing a kids' bathroom built to last.
Select Permanent Fixtures That Can Handle Real Life
These are the most consequential choices in a bathroom, also some of the most expensive and disruptive to change later. The decisions you make here will affect the look and longevity of the space for years.
Flooring: Use tiles with slip resistant ratings, such as matte finishes. Or select small tiles like hex or penny rounds that have more grout, which creates a non-slip surface. Note: smaller tiles require more grout which may get stained and grimy over time, which means more cleaning!
Tile size and color: Choosing larger sized tile such as 12” x 12” or 12” x 24” calls for less grout and cleaner lines, and less grout scrubbing! Neutral colors and timeless designs will stay in style for the toddler to teen transition periods. Always check the slip resistant ratings.
Shower tiles: In kids and teen bathrooms, shiny wall tile is the way to go in showers. It's easier to wipe down and less likely to hold onto mold or soap residue. Light colors will show water spots less than dark colors. Larger tile sizes mean fewer grout lines to scrub clean.
Grout color: White grout is unforgiving. In a kids' bathroom, it will show staining from makeup, nail polish, hair dye and everyday grime faster than you'd expect. A neutral greige or mid-tone grout color is far more forgiving and will continue to look good with less effort.
Bathtub: We always recommend having a tub in a kid’s bathroom. A strong cast-iron or acrylic tub will stand the test of time, from bath toys to long soaks. Standard white will go with any color scheme or design theme over the course of years.
Showerhead, faucets, fixtures: Select timeless finishes such as chrome or brushed nickel for kid to teen bathrooms. Install an adjustable shower head on a slide bar that can be lowered for young children and raised up for teens or guests. Use anti-scald valves for all faucets to prevent burns.
Cabinets: Size the vanity and mirror for adults, not children. Install cabinets at a standard comfort height of 35” to 36” and set mirrors accordingly to that height. Pull-out step-stools can be built-in to cabinets so kids can reach, and they will grow into the standard height before you know it!
Countertops: A solid quartz or quartzite surface, which is durable, easy to wipe clean, and low maintenance is always a good choice. Select a neutral color with a natural stone look or marble veining that won’t seem dated in a few years.
Design the Space to Grow with Your Kids
The goal is a bathroom that doesn't need to be redesigned just because your kids got older or their tastes changed. The way to accomplish that is to keep the permanent, hard-to-change elements neutral and let the easy-to-swap design elements carry personality.
Keep the fixed elements timeless. Tile, vanity, countertop, fixtures—these are the things that cost real money to change. Choose colors and styles that are clean and neutral. White, off-white, soft gray, and warm greige all hold up well. Avoid anything that feels very of-the-moment.
Let the easy-to-change elements do the work. Paint color, shower curtain, towels, accessories—these are low-cost, low-effort swaps that kids can actually have some ownership over. A child who wants a bright yellow bathroom can have bright yellow towels and a fun shower curtain without requiring a tile installation. When their taste changes (and it will), you swap the accessories, not the whole room.
Have some fun with hardware. Cabinet pulls and knobs are an easy swap later, so this is a good place to choose something with a little personality. Glass or painted knobs, or knurled pulls can add style without being permanent.
What to Salvage and What to Replace in a Kids' Bathroom Remodel
If you do decide to do a full bathroom remodel, you'll face decisions about what's worth keeping. Here's a general framework:
Tile: In most cases, bathroom tile does not salvage well. Grout discolors, tile cracks or chips, and the overall look tends to be too tied to the original design to work with updated finishes. Unless the tile is in excellent condition and you're genuinely happy with the style and scale, budget to replace it.
Cabinets: Worth evaluating case by case. If the box is solid and the layout still works, painting and adding new hardware can deliver a significant visual refresh at a fraction of the cost of full replacement. If the layout is wrong, the condition is poor, or you're changing the countertop height, replacement is usually the better investment.
Countertop: Depends entirely on whether you'd choose it again. If the answer is no—if it feels too specific to a moment in time, or too catered to small children—replace it. Countertops are one of the most visible surfaces in a bathroom, and keeping one you don't love rarely feels like a savings once the rest of the room is refreshed.
Fixtures: Faucets, shower heads, and towel bars are relatively affordable to replace and have a big impact on the updated look. If you're remodeling, this is usually worth including in the scope.
The Bigger Picture
A well-designed kids' bathroom can function beautifully for children and also transition into a guest bath or secondary bathroom for teenagers and adults. The difference comes down to design choices that prioritize durability, neutrality, and flexibility over novelty.
The spaces that hold up best over time are the ones where the permanent elements were chosen with care, and the personality was layered in through accessories and paint, not baked into the tile and countertops.
If you're planning a remodel or a new build and want to think through bathroom design choices that will last, we'd love to help. If you're just beginning to map out the scope of a larger project, our guide on what to know before you start a remodel is a good place to begin. You can also browse our remodel portfolio for inspiration, or contact us to start a conversation. And if you'd like design tips and project updates delivered to your inbox, sign up for our newsletter.
Sammamish Entryway Remodel: Elevated Details
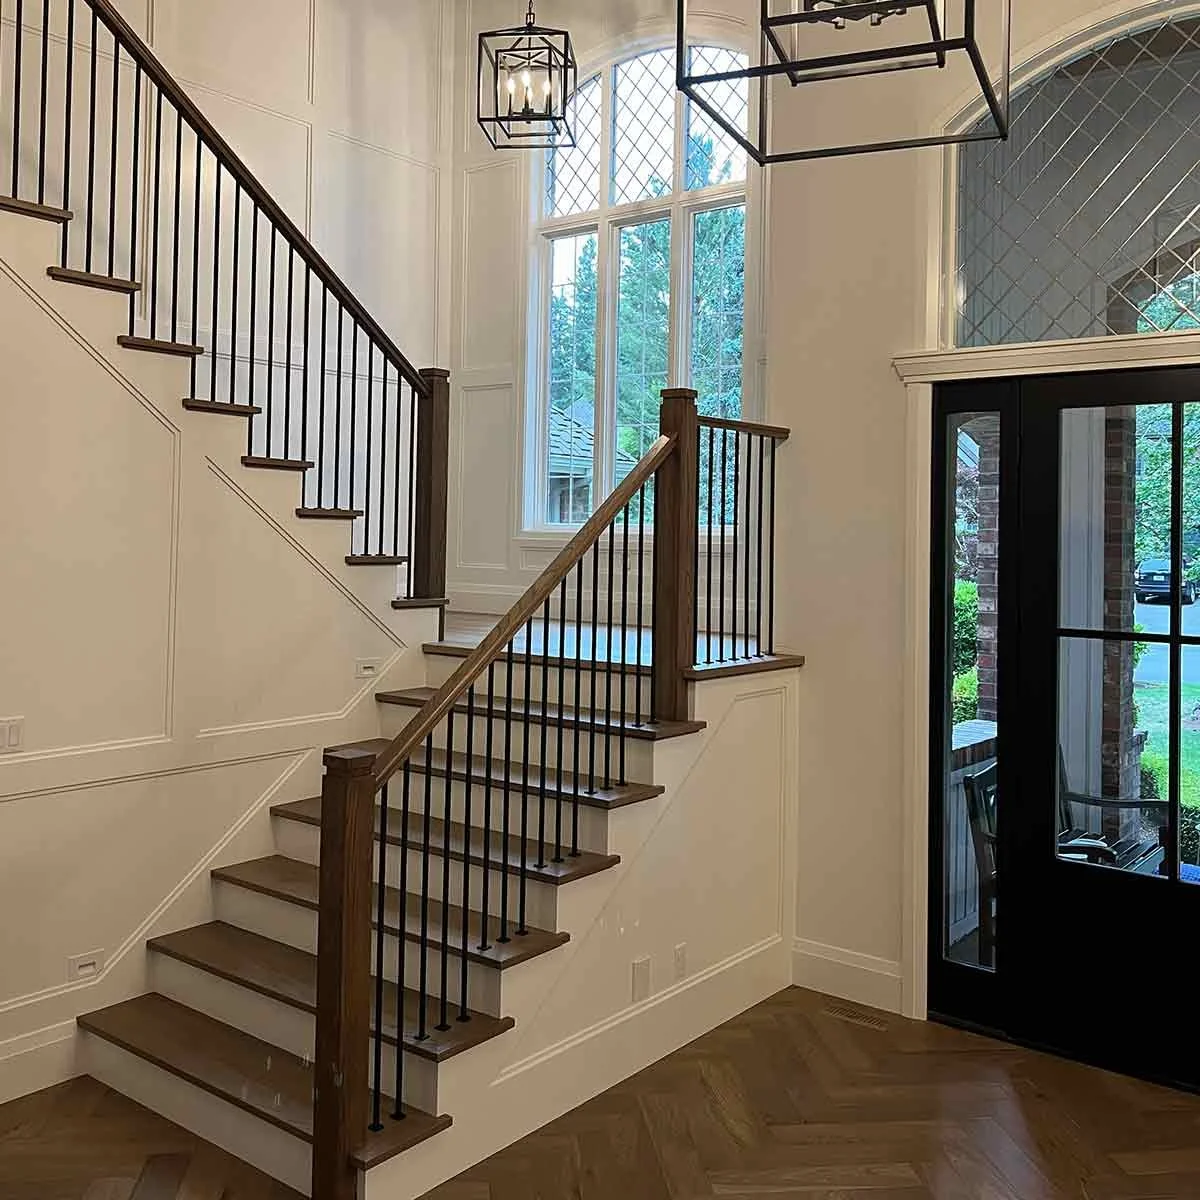
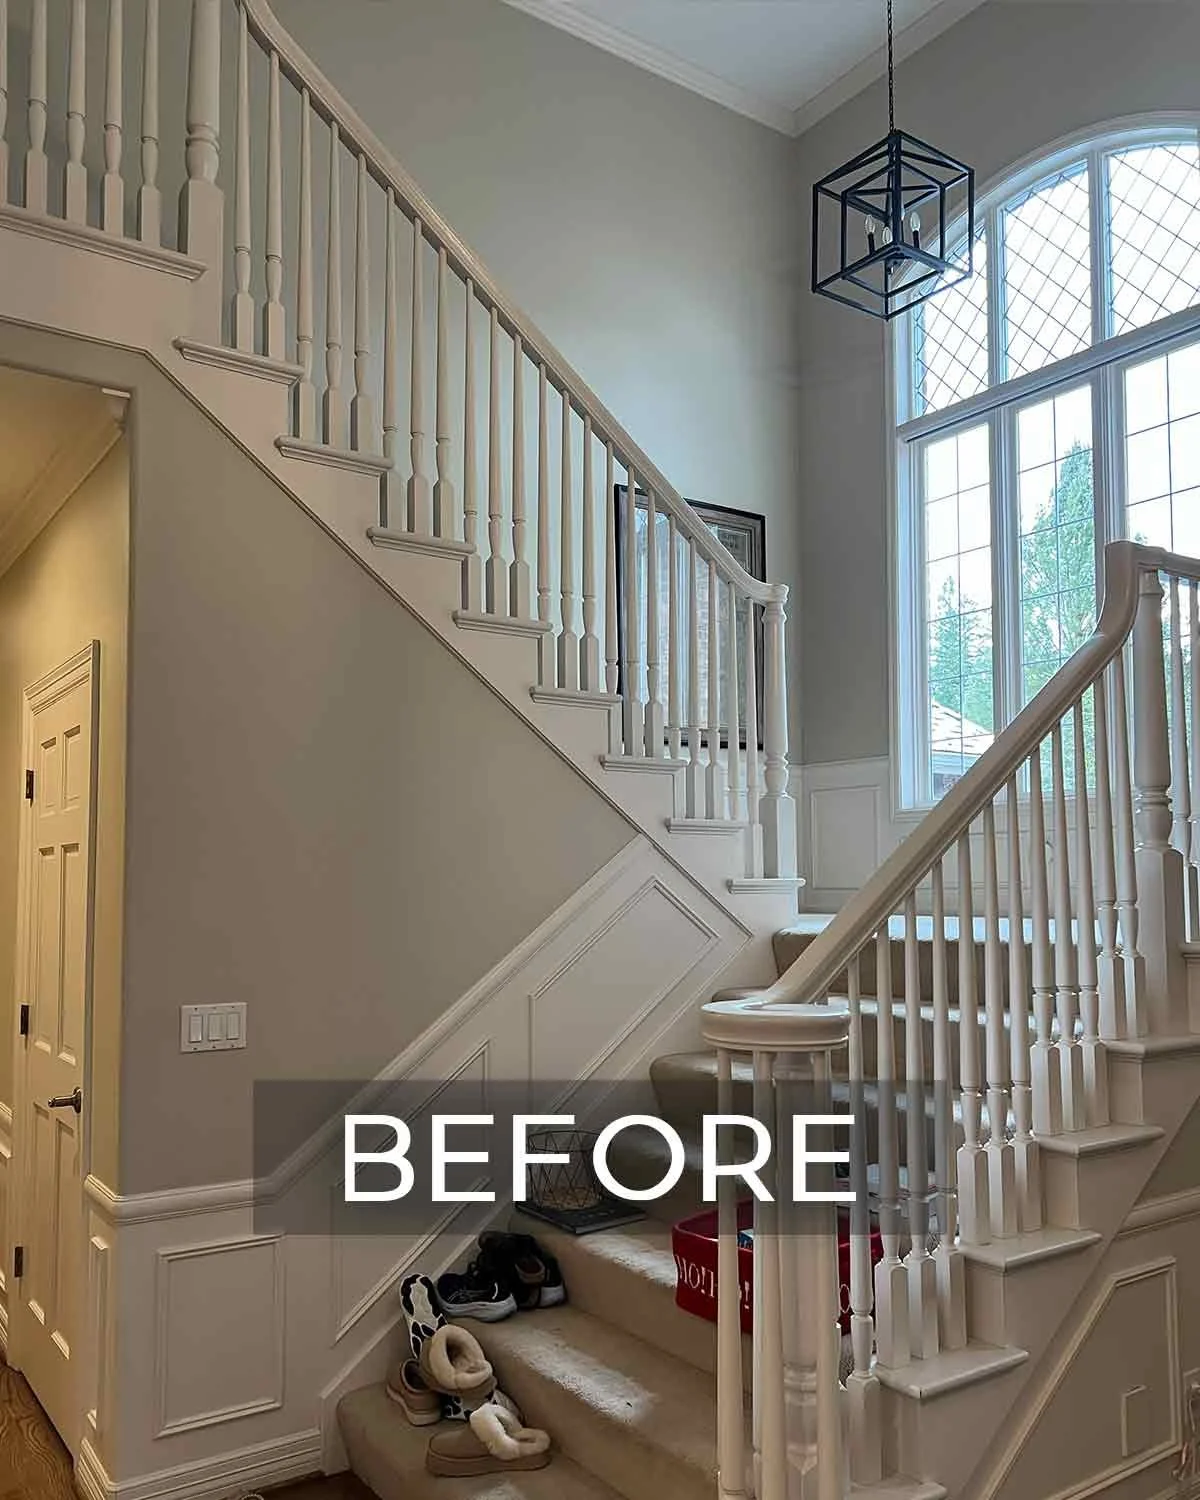
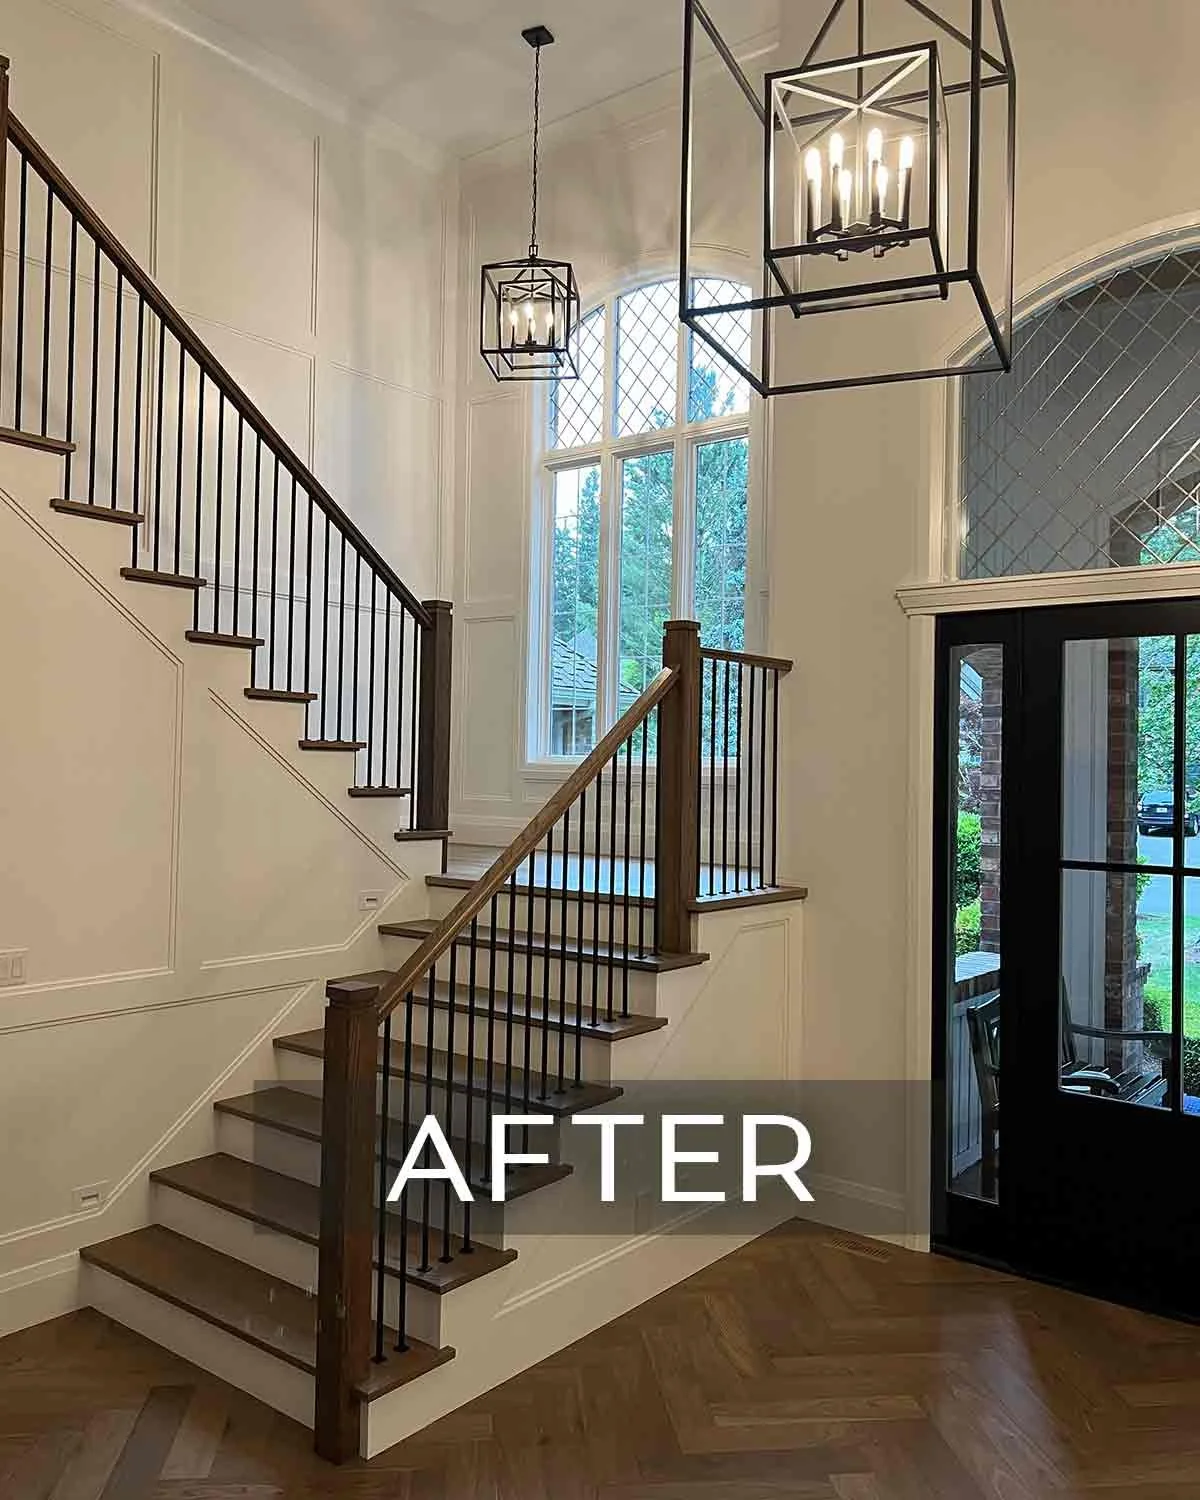
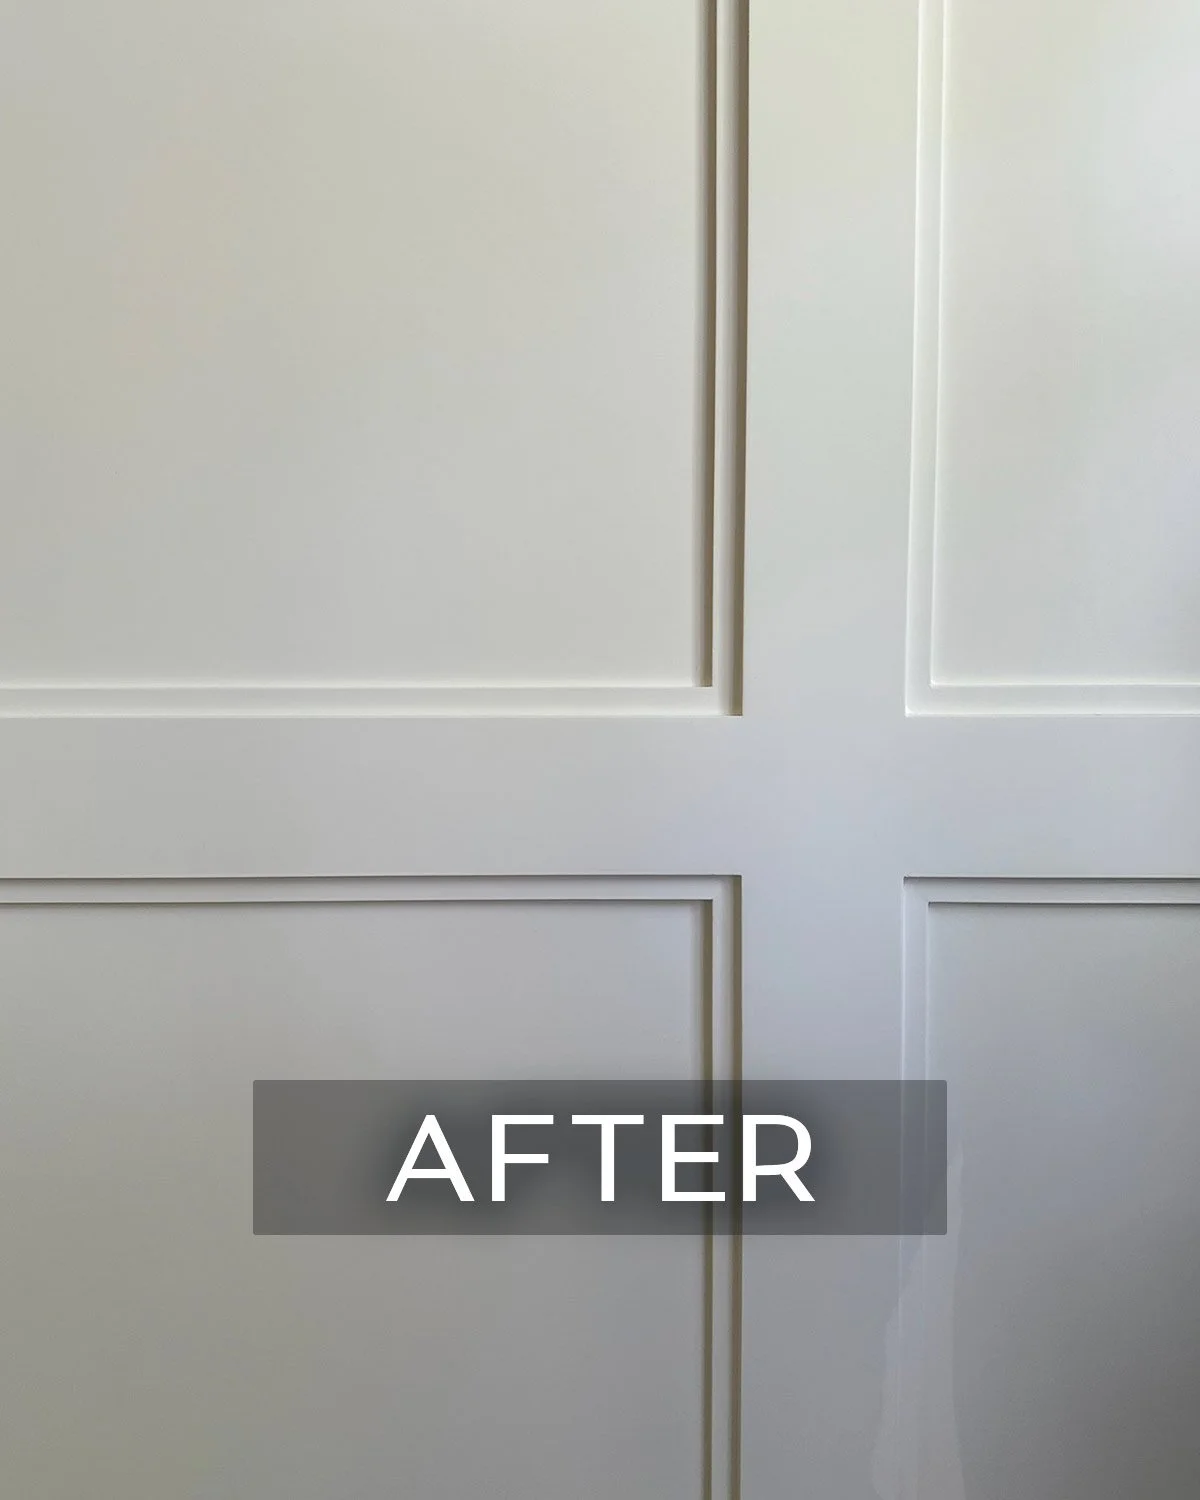
This entryway and staircase remodel shows how thoughtful material updates can completely refresh a space—without changing the layout. New railing, millwork, flooring, and paint brought a brighter, more refined feel to this high-traffic area of the Miller whole house remodel.
In our whole-house remodel of this 90s traditional home, the entryway and staircase received a focused refresh that proves you don’t need to change the layout to make a big impact. The existing footprint stayed exactly the same, but thoughtful updates to the railing, millwork, flooring, and paint completely transformed how the space feels.
Before the remodel, the entryway felt dated and a bit worn from daily use. By introducing a new stair railing, refined millwork details, updated flooring, and a fresh, cohesive paint palette, the space was brought back to life. These changes enhanced the natural light already present and gave the entry a cleaner, more intentional look without altering its original flow.
This project is a great reminder that high-traffic spaces benefit most from material and detail-driven updates. With the right design choices, an entryway can feel timeless, welcoming, and polished—while still honoring the home’s original layout.
Explore the gallery below to see the before and after photos of this entryway and staircase refresh!
If you’re thinking about refreshing your own space, visit our Interior Design & Remodel Services page to learn how we can help you reimagine your home with craftsmanship and care.

Traditional 90s Living Room Remodel: A Fireplace-Centered Redesign
In this Miller home remodel, Sierra Homes reimagined the formal living room with fresh finishes and a custom-designed fireplace that now serves as the true focal point of the space. The result is a warm, inviting room that perfectly balances modern refinement with personal detail.
In our Miller home remodel in Sammamish, WA, the formal living room was ready for a refresh—and we loved helping this family bring it to life. With new flooring, fresh paint, and updated millwork, the space already felt brighter and more refined. But the true transformation came with the reimagined fireplace: custom-designed to showcase a favorite piece of art and serve as the heart of the room.
This remodel is a perfect example of how thoughtful design makes every detail feel intentional. By balancing clean lines with warmth and character, we created a space that feels elevated yet personal—one that reflects our clients’ style and the way they truly live in their home.
Explore the gallery below to see the before, during, and after photos of this transformation!


If you’re thinking about refreshing your own space, visit our Interior Design & Remodel Services page to learn how we can help you reimagine your home with craftsmanship and care.

Kennydale 1940's Remodel - Modern Farmhouse Bonus Room Transformation
Curious how we modernized this bonus room’s look while keeping the 1940’s charm? Check it out!
Thoughtful design challenge: Modernizing this bonus room’s look while keeping the 1940’s charm
Discover the careful process of updating old-fashioned charm with modern style! We transformed this 1940s bonus room in our Kennydale Modern Farmhouse Remodel by blending modern touches with its original appeal. From painting red bricks gray to adding an energy-efficient fireplace, updating millwork, and refinishing hardwood floors, see how old meets new seamlessly.
Kennydale, WA 1940's Remodel - Modern Farmhouse Bonus Room BEFORE


Looking to refresh an outdated space? Get in touch!

Sammamish Mid-Century Family & Office Remodel
See how we removed an outdated fireplace, created new spaces, and brightened a 1962 mid-century family room & office.
Thoughtful design challenge: Removing an outdated fireplace and creating two new rooms, while brightening and updating the space
This 1960s family room in Sammamish, WA was weighed down by dark, outdated elements and impeded flow. It needed an update that would:
Transform the space by creating two new rooms out of one large room.
Keep the aesthetic of the mid-century modern era in this 1962 home, which still had much of the original building materials and design elements.
Challenge accepted!
Design challenges:
Remove the outdated, oversized, black-painted stone fireplace that was dividing the room down the middle, blocking the flow of the space.
Brighten up the entire home by removing the brown stone floor and outdated dark hardwood and replace all with polished, modern tile.
Bring in more natural light by adding windows and create a large glass wall and glass door leading out to indoor pool area.
Create two rooms, one for a functional office space that also serves as a guest bedroom and another large family room for TV and modern fireplace.


Looking to refresh an outdated space? Get in touch!

Sammamish 1990s Kitchen Remodel
Explore how we transformed a worn 1990s Sammamish kitchen with a fresh layout, painted cabinets, updated appliances, champagne bronze finishes, and functional storage solutions.
Thoughtful design challenge: Revamping a dated 90s kitchen with new layout, appliances, and style
This 1990s kitchen in Sammamish, WA was outdated with worn, broken cabinets, a built-in microwave/oven combo that no longer worked, and a leaking dishwasher.
Time for a complete makeover!
Design challenges:
Create a cabinet layout with a new 36” range into a corner/diagonal wall.
Bring in color by using a trending painted cabinet style.
Match existing hardwood floors and install all new on the entire main level.
Replace all appliances with new, top of the line, coordinating pieces.
Design a pantry cabinet with roll-outs for maximum storage.
Update plumbing fixtures, lighting, and cabinet hardware with champagne bronze
Freshen up quartz with bright, white color with gold veining.
Rebuild fireplace surround and add floating shelves to the family room.


Have an interior design challenge or remodel project? Reach out for help!

Kennydale 1940's Remodel - Modern Farmhouse Kitchen Transformation
Take a look at how we created a more functional, open, and bright space in this 1940’s kitchen.
Thoughtful design challenge: Creating a more functional, open, and bright space in this 1940’s kitchen
Consider the challenges of the outdated 1940’s kitchen in our Kennydale modern farmhouse remodel and witness the incredible transformation!
Design challenges:
We conquered the small, closed-in feel by raising the ceiling and moving a wall.
We tackled the non-functional layout with no storage by redesigning, moving appliances, and creating a pantry/buffet.
We banished the dark, heavy setting with natural oak floors, white cabinets, more lights, and a larger kitchen window.
The result? A fresh, virtually unrecognizable space!
Kennydale 1940's Remodel - Modern Farmhouse Kitchen BEFORE


Looking to refresh an outdated space? Get in touch!

Issaquah 1950s Kitchen & Den Remodel
Explore how we opened up a 1950s Issaquah, WA kitchen and den, navigating load-bearing walls and plumbing to create a bright, open-concept space with an eating bar.
Thoughtful design challenge: Opening up a 1950s kitchen & den while factoring in load-bearing walls & piping
The owners of this 1950s home wanted to update their kitchen and den to create an open concept feel by removing an old wall that was dividing and closing off the two rooms.
Design challenges:
Once demolition began, there were surprises found inside the dividing wall that would pose a challenge moving forward. Part of the wall was load bearing and another part held old drain pipes coming down from an upstairs bathroom, none of which could be removed.
Challenge accepted! We worked around the problem areas, removing as much of the wall as possible, which really opened up the space to the new kitchen, bringing in more light and even provided a large eating bar and work area.


Ready to transform your living space? Reach out!

Welcoming Retreats: Expert Tips for Crafting the Perfect Guest Room
Creating a welcoming guest room in your home is easier than you think! With our many years of experience building custom homes, we’ve accumulated a solid list of best practices.
Creating a welcoming guest room in your home is easier than you think! With our many years of experience building custom homes, we’ve accumulated a solid list of best practices. Some of these ideas you can use to transform an existing room into one specifically for guests. Others are helpful if you are working on a dream home of your own and want to be sure to plan ahead for those overnight visitors.
If you’re designing an existing space:
Privacy is key, so aim to provide each guest room with its own bathroom whenever possible.
Opt for two twin beds that can double as a king-size bed when needed, ensuring versatility without sacrificing comfort.
Enhance the guest experience by incorporating amenities such as a television for entertainment
Ensure ample lighting throughout the room for a cozy atmosphere. Consider sconces over the nightstands and corner lamps to supplement any overhead lighting.
Consider adding stylish storage solutions - like an armoire in the guest room and a basket or stool in the guest bath - to keep the spaces tidy and organized
Install hooks in both the designated guest bathroom and bedroom to offer convenient spots for hanging towels and personal items

Stylish guest bathroom with double sinks, a basket for used towels, and elegant spa touches
If you’re in custom building or remodeling mode:
Design the guest bathroom as an attached space, converting this area into a guest ‘suite.’
If the bathroom is doing double duty as a general guest bath and one attached to the guest room, offer two entrances.
Plan ahead so the guest room can accommodate two twin beds & sconce lighting.
Consider putting two sinks in the guest bath, if space allows.
With these thoughtful touches, your guest room will become a haven of comfort and relaxation for your overnight visitors of all kinds.

Maple Valley Bathroom Remodel
See how we refreshed an outdated Maple Valley bathroom with smart design, featuring a walk-in shower, separate vanities, and skylight-friendly solutions.
Thoughtful design challenge: Refreshing this outdated bathroom while accommodating the skylights
A lovely, retired couple in Maple Valley, WA had been in their home since the 1980s and had gotten used to living with the outdated bathroom, which was ready for a much-needed refresh! There was a step-down sunken tub, wall-to-wall carpet (yes - in the bathroom), wallpaper peeling off the wall, and all the popular mauve colors of the time.
When I first walked in, I noticed the skylights throughout the ceiling and knew that would be the biggest challenge in coming up with the design plan. After several concept drawings, we settled on a design that eliminated the bathtub altogether, created a walk-in shower in the corner, closed in the toilet room, separated the vanities, and made a larger walk-in closet along the back wall. The happy customers are now ready to update the rest of the house!


Have an interior design challenge or remodel project? Reach out for help!

Has Gray Had Its Day?
While gray has been the most popular interior design color for (at least) the past 10 years, the most common question I hear from client’s lately is, “Is gray still in style?”
While gray has been the most popular interior design color for (at least) the past 10 years, the most common question I hear from clients lately is, “Is gray still in style?”
Homeowners are thinking about whether to transition away from the beloved gray, or to bring in a new color that works alongside the cool neutral. When working with clients to design a new home or update an existing space, we are slowly starting to move into more warm neutrals that will coordinate, as many people own furnishings and artwork that go with a gray palette.
Gray is classic and tends to show up as a useful neutral color, which can work well when balanced with warm tones; just a touch can be nice in almost any space, as long as it is used in moderation and is not the main inspiration for that space. Use gray intentionally and think about how it can enhance your color palette.
When working with custom clients at design showrooms, I have recently noticed the following shifts in the colors:
Quartz slabs, (once crisp white and cool gray), now feature a mixture of gold or caramel alongside warmer gray veining
Hardwood floors, (once washed with gray stain on top), are now left natural or stained a deep, wood tone to warm up the space.
Tile selections, (once limited to concrete looking shades of gray), are now leaning more neutral, beige and warm, or even fun, bold colors

LEFT: Common tile line used in recent years
RIGHT: Newer, warmer tile being used in upcoming houses
Paint colors, cool grays are being replaced with warm whites and soft beiges
As the trend cycles away from gray, it is not necessary to completely do away with it, but let’s work with it! Bringing in neutral tones, natural elements, or bold colors can work cohesively with gray to freshen up any space.
How To Boost Curb Appeal
A home’s exterior is the first thing we notice when driving up - and first impressions matter! Well designed exteriors make the home more attractive, boosting curb appeal and increasing property value.
A home’s exterior is the first thing we notice when driving up - and first impressions matter! Well designed exteriors make the home more attractive, boosting curb appeal and increasing property value. When remodeling a home, it is important to consider just how much redesigning will make the upgrades worth the investment.
When deciding on the renovation plans for the 1940s home in Kennydale, it was safe to say that redesigning the exterior would be well worth it in the long run. The original home was very plain and simple with few windows, a small front entryway and minimal landscaping. The house was outdated and not coordinating with the aesthetic of the newer homes in the area.

Original 1940s Kennydale home front view
Updated front view with improved curb appeal
Working with an architect was necessary for a new design that would be more functional while creating a distinct look that would fit in with the existing houses in the neighborhood. Creating dimension by adding a large covered porch would add interest to the front of the house and bring it up to date. Walkways and a driveway will complement the updated landscaping and appearance of the new porch, which will create instant curb appeal and an overall beautiful exterior!
How To Update An Older Home While Keeping Its Charm
While it may be tempting to completely gut an old house and fill it with all that’s trendy and new, keeping the home true to the era in which it was built will help preserve its charm.
While it may be tempting to completely gut an old house and fill it with all that’s trendy and new, keeping the home true to the era in which it was built will help preserve its charm. Before beginning any renovations, research the styles of the time period to determine what historical features should be kept and which could be updated.
For example, the design elements for a mid-century modern home built in the 1960s to 1970s will differ significantly from those found in a 1930s to 1940s art deco style home. And all the styles of decades past are completely different than the contemporary look of today’s modern homes.
With all the various styles and time periods to consider, design selection can be difficult and overwhelming when renovating. But with many of the “vintage” looks trending today, one can easily find new, similar pieces needed to complete the look. Done properly, you will have the charming look of an old home mixed with new home luxury!
We just completed a design project for a client with a 1960's mid-century modern home who needed new hard surface selections (the original designer hadn't kept with the true aesthetic of the home and took her way over budget). In keeping with the roots of the home, the exterior stone, wood beams, stone entryway, and some wood cabinets would remain in place while other updated surfaces would be added to enhance the original look.

These countertops and tile elements complemented the roots of the home beautifully
We found hard surfaces to match the stone entryway flooring
The result was a timeless masterpiece of genuine mid-century design mixed with modern pieces that update the space in every room. And we saved her over $23,000!

Issaquah Modern Ranch House Fireplace Update
See how thoughtful design transformed bulky, soot-stained fireplaces into sleek, gas-powered features, opening up a 1960s Issaquah ranch home for a brighter, modern look.
Thoughtful design challenge: Reworking the fireplaces to open up & brighten this living room and kitchen
The fireplace in this 1960s Issaquah, WA ranch home was the bulk of the space, taking up most of the room and closing off the kitchen from the living room. To make the fireplace smaller and open things up, the bookshelf on the end was removed, and part of the bricks on the kitchen side were taken out to create a built-in pantry for extra storage.
Before the remodel, the fireplaces were wood burning and the bricks were stained with soot. The homeowners wanted gas fireplaces for the ease of lighting with the flip of a switch and for the cleaner burn of gas. Gas inserts were installed and instantly: updated fireplaces! We installed shiplap above the fireplaces, and had a fun DIY day scrubbing and white washing the bricks for a clean and transformed look.


Have an interior design challenge or remodel project? Reach out for help!

Fireplace Focal Points
Whether designing a new home or refreshing an existing space, it is easy to transform a room by making the fireplace the focal point.
Whether designing a new home or refreshing an existing space, it is easy to transform a room by making the fireplace the focal point. Choosing the material for a fireplace in a new home is always determined by the style of the house. Sierra Homes often builds in a contemporary style with high vaulted ceilings. This calls for a dramatic fireplace design (like the bookmatch design featured below) that can range from large format tiles, concrete, stone, or even slabs of porcelain on the face. There may be a hearth and/or mantel depending on the desired look.
For our remodel or design clients, fireplace renovations are the most requested. We have created stunning centerpieces from old, shabby fireplaces that just needed a little TLC – or a major overhaul! The trend is to remove old wood burning fireboxes and replace with gas inserts that appear more upscale and sleeker. Then by replacing the old stone with new material, or whitewashing bricks (like we did in this 1960's ranch home below), we have created an elegant fireplace that becomes the centerpiece of the room.

We removed the bookcase, added shiplap above & whitewashed the fireplace brick in the kitchen

We added shiplap above and whitewashed the fireplace brick for a brighter look in the living room.